Dental Photo Guide
Help us understand your current smile and oral condition by sending clear photos. These, along with your X-rays (if available), allow our partner dentists to prepare accurate treatment plans and cost estimates. Follow this guide to take the right photos for your dental evaluation.
Why it matters
Clear dental photos help our dental partners:
- Assess your current condition.
- Suggest the best treatment options.
- Provide accurate price estimates, often within 24–48 hours.
What you’ll need
To take effective photos, prepare:
- A smartphone or digital camera.
- Good lighting (preferably natural daylight or a well-lit room).
- Clean hands and a mirror.
- A friend to help or a selfie mode with a timer.
How to take the right photos
Follow these simple steps to capture clear dental photos:
| Front View | Lower View | Upper View |
|---|---|---|
 |
 |
 |
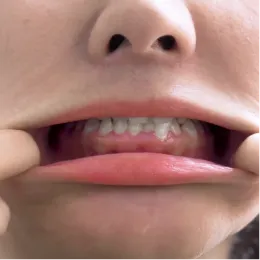
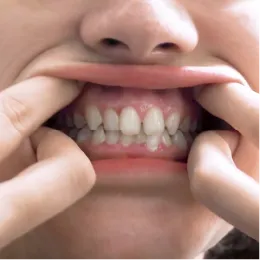
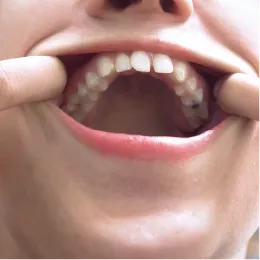
| Profilet View: Keep the lips and mouth normal relaxed position. | Lower Teeth: Pull your lower lip outward using clean fingers. | Upper Teeth: Pull your upper lip back using clean fingers. |
 |
 |
 |
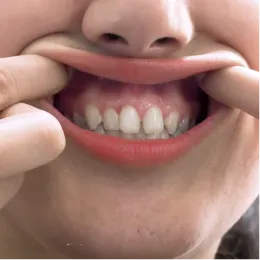
| Front View – Lips Retracted: Pull your lips apart using clean fingers or spoons to expose all teeth. | Lower Arch: Tilt your chin down and open your mouth wide. | Upper Arch: Tilt your head back and open wide. |
Tips for best results
- Ensure sharp focus: Make sure images are clear and not blurry.
- Avoid shadows: Use natural light or a ring light for even illumination.
- Clean your lens: Wipe your camera lens before shooting.
- Show all teeth and gums: Capture as much detail as possible.
- Remove dentures: If you wear dentures, take them out before photographing.
Why QCG supports your dental care
Our platform connects you with trusted dental providers who use your photos to create personalized treatment plans. By following this guide, you help ensure accurate assessments and cost estimates, setting the stage for quality care.
Ready to share your photos? Create an account or contact us to get started!